Sensors Challenges 1
Ready to go?
Goal of these challenges:
- Apply your newfound c++ abilities by using the sensors and actuators on your robot
- Link to Guide on How to Use Robot
- Note: all of these challenges are pre-calculus and pre-state machines
Star Scale
- ★ Checkpoint Challenges: trinket earned when you complete all of these:)
- ★★ Slightly Harder, may require arrays or complex logic
- ★★★ Advanced c++ skills, such as pointers, required
Blinking LED
Using the LED
- The LED can tell us a lot about what the robot is thinking
- Examples include if an object is detected or if a goal has been achieved
- By changing the speed of the blinks, you'll have a secret code between you and your robot;)
★ Control blinking speed with a function:
- Create a function called blink_led()
- This function should return void
- This function should input the speed of the blinks (in milliseconds)
- Call this function in main() to see what happens!
Push Button
Applications:
- The button can be used in tons of ways
- For example, the button can be used to call any functions you write!
- One really helpful use is to have your robot start moving after you press the button
Push that button!
- ★ Have the button call your blink_led()function!
- ★ Have the button change the servo position
- Hint: add 10 to the servo's position if the button is pressed
- ★★ With arrays: Have the button index through an array of integers
- Bonus: use this array to set servo positions
Motor Characterization
Why bother?
- Because no two motors are the same, supplying the same
motor power (or PWM signal) to both motors does NOT mean
that each wheel will travel the same speed.
- If we want our robot to follow a certain path, for
example, driving straight, we might need to supply different
power to each motor
- This challenge will help us characterize the motors on
the robot
★ Procedure
- Have the push button start each test
- Make sure you have a battery plugged in to your Raft! (the DC motors need 9V)
- Find the minimum power required to get each motor to spin
- This minimum power is called the "deadband" of the motor
- Keep note of each deadband somewhere
- Set both motors to some power above the deadband
- Determine which motor is faster based on how your robot moves
Odometry Challenges
What is Odometry?
- Odometry means calculating the position or orientation
of the robot
- We can calculate how far each wheel has
traveled based on the count of the encoder wheels
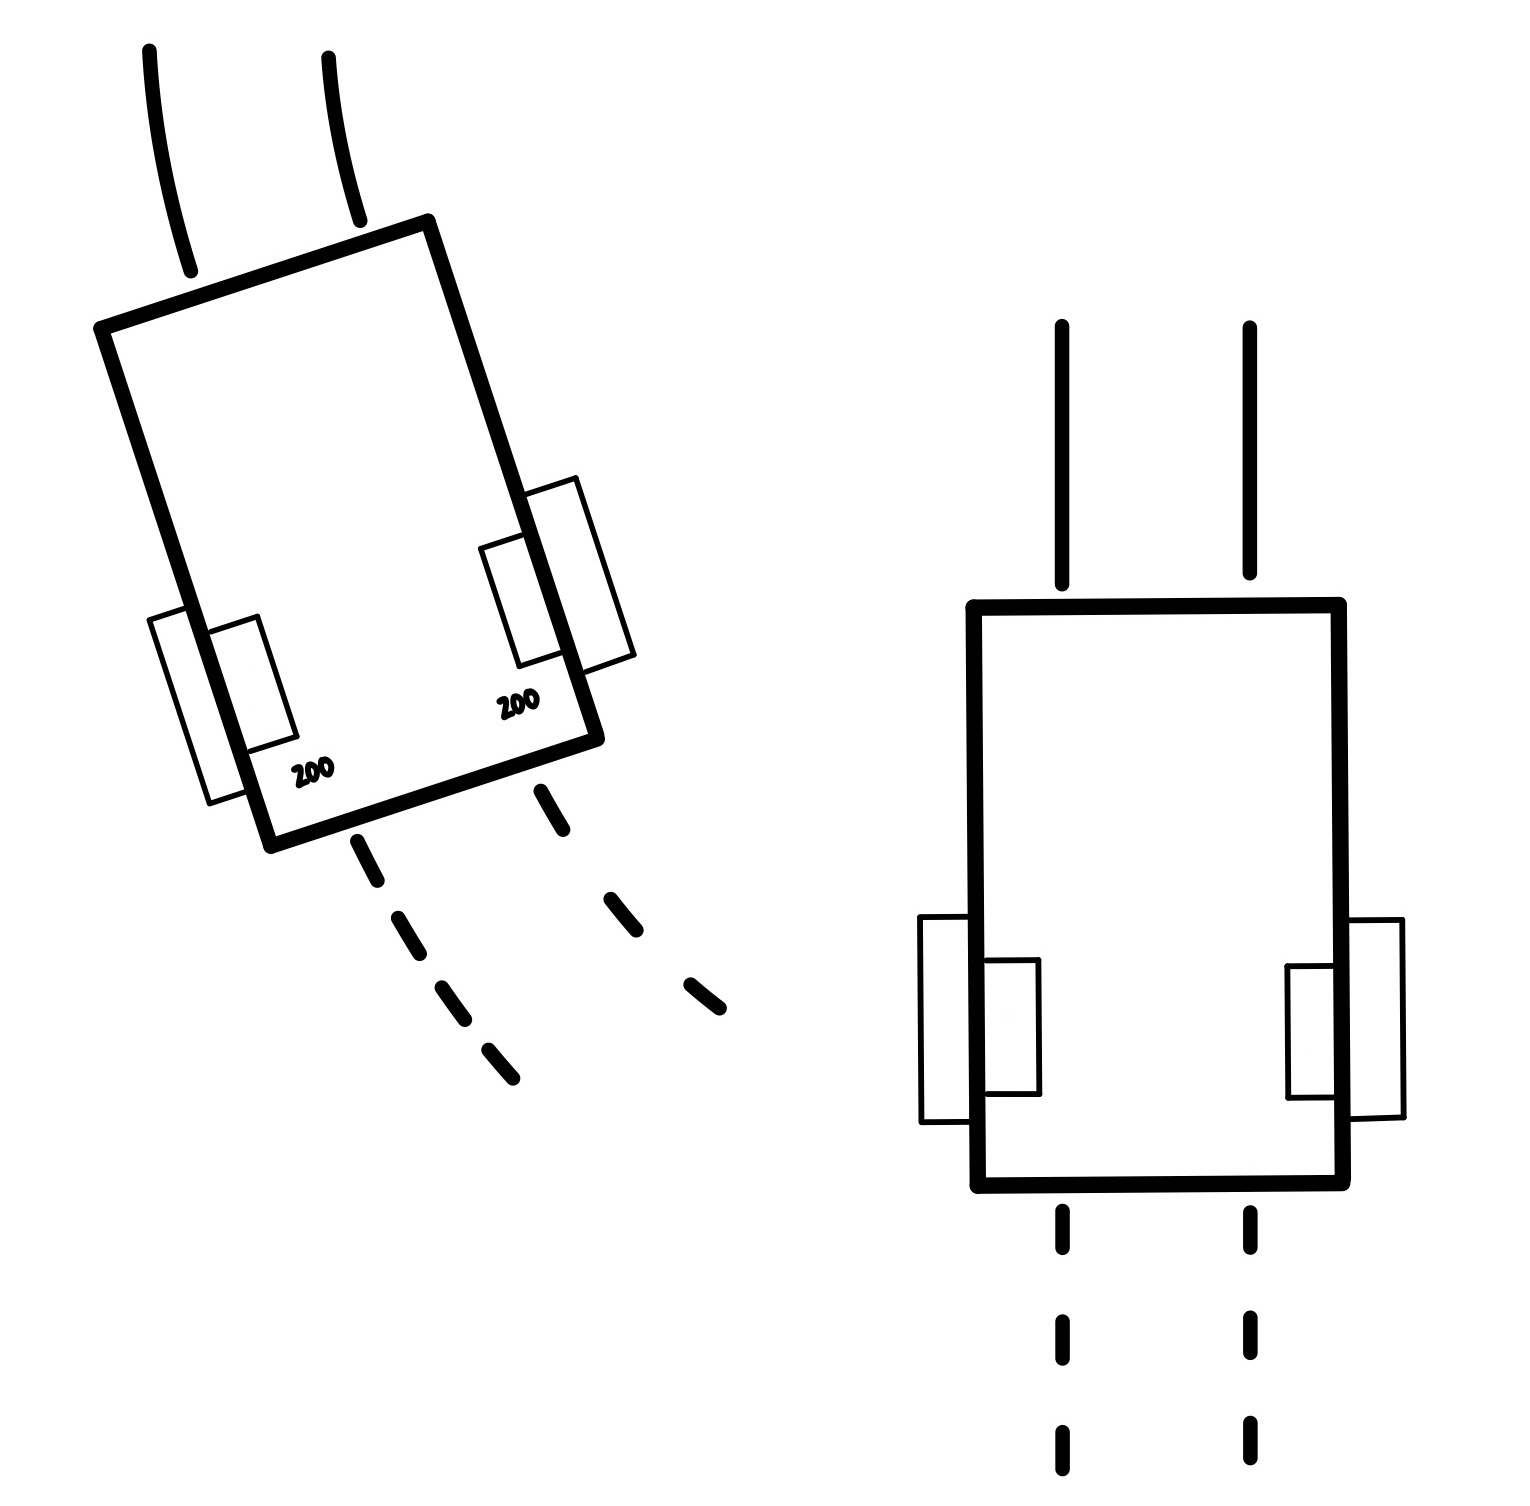
★ Stop after a distance
- Use the button to start the motors
- Give both motors the same power (something above the deadband)
- Stop the robot when BOTH encoders reach 200 counts
More Odometry Challenges
Preview to Rotational Kinematics ;)
- Soon we'll go over the math required to calculate a trajectory based on encoder data
- For now, you can start experimenting to get a feel for it
★ How many counts in one rotation?
- Experimentally determine how many counts getCount() returns in one rotation of
the wheel
- How many counts for 10 rotations?
★ Rotate robot 360 Degrees
- Pick your favorite wheel, only give that wheel
power
- Experimentally determine how many counts for the robot
to spin around itself once (full 360)
★ Rotate robot 90 Degrees
- Give only one wheel power
- Experimentally determine number of counts to rotate 90
degrees
- Stop the robot after it rotates 90 degrees
★★★ Making functions
- Make a function right_turn() that makes a right turn >:)
- Make another function for left turns
- Make a travel forward function that takes in a number of
counts as a parameter
Lidar Challenges
How can we detect objects?
- The lidar sensor returns a distance in millimeters,
which is very precise; we can use it to detect obstacles
the robot should avoid
- Since our lidar is attached to a servo motor, we can
check for obstacles all around the front of the robot
★ Searching for object by spinning robot
- Use button to start wheels
- Hint: it is helpful if you make servo face forwards:)
- Have robot spin clockwise, have 2 options:
- rotate only one wheel
- rotate one wheel forwards, one backwards
- Stop the motors when lidar detects an object less than 200 mm away
- Bonus: blink the LED to show object detected!
★★★ Write a Function:
- Write a function that when called searches for the object
Intro to Autonomous Navigation
Autonomous?
- Autonomous Robots are able to sense their environment and make decisions based on those inputs
- Robots from Roombas to a Teslas have similar obstacle avoidance algorithms
- Other robots like for search and rescue applications may have object tracking algorithms
★ Hit the brakes!
- Use button to start robot's wheels
- Have servo face forwards
- Have robot drive forwards
- If an obstacle is detected, hit the brakes!
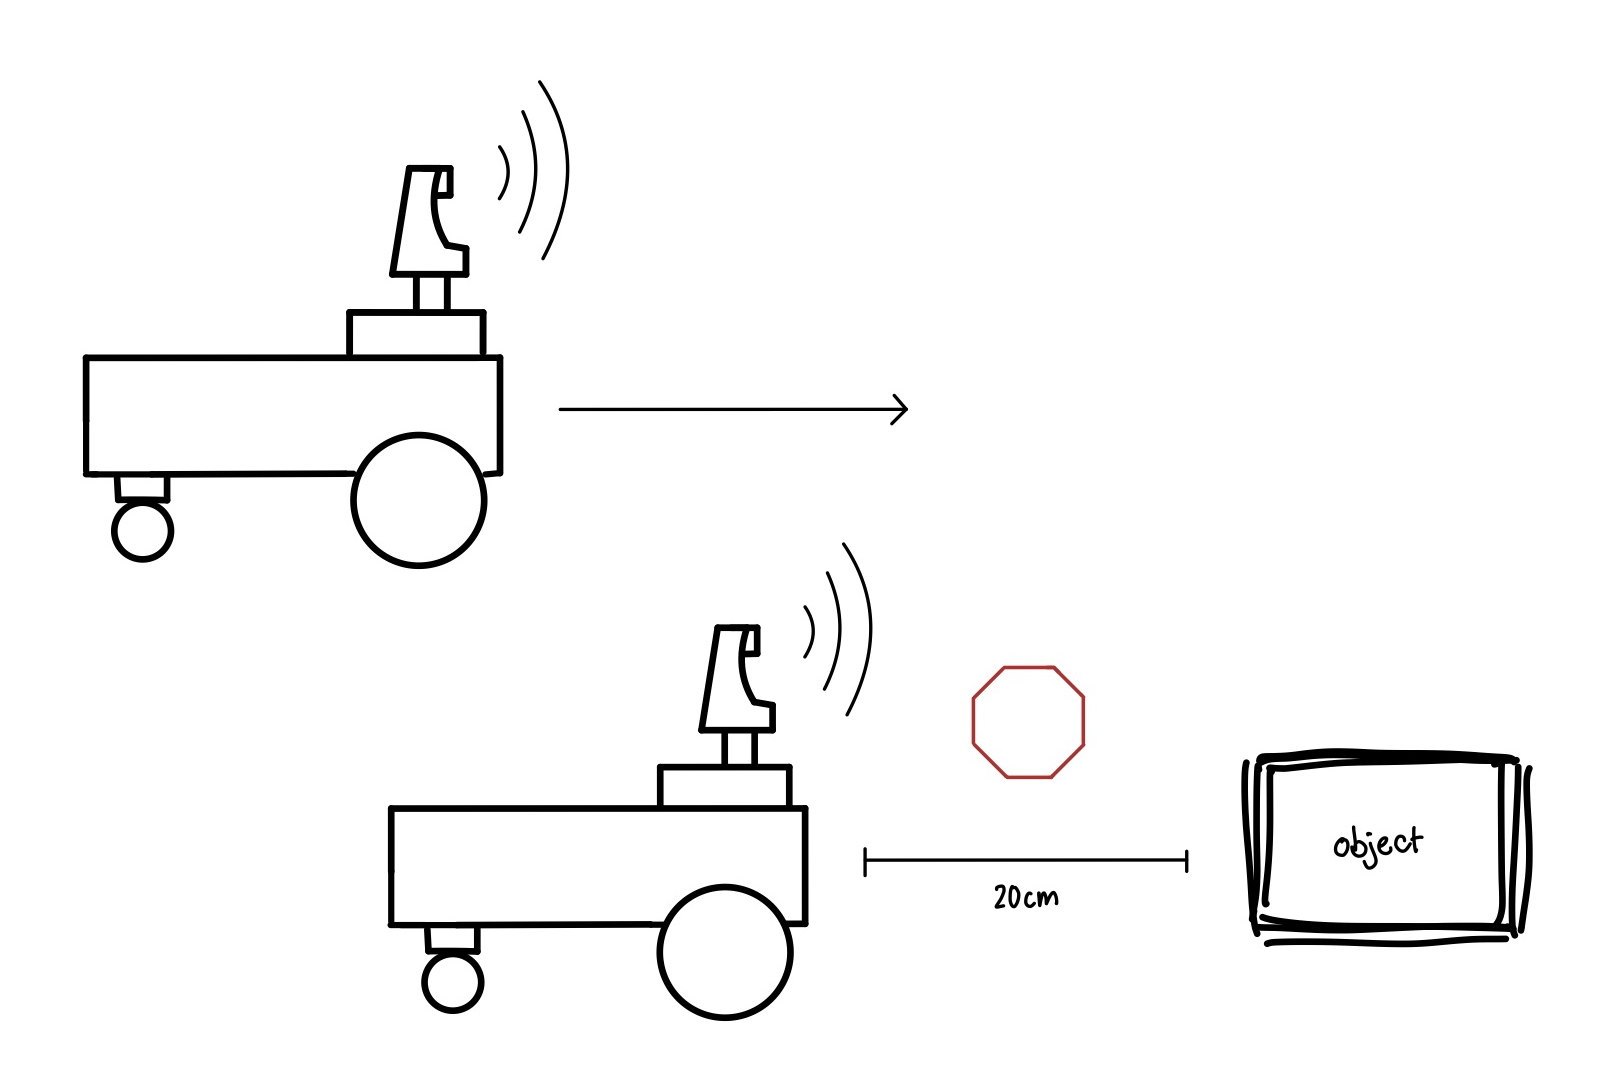
- Use button to start robot's wheels
- Have the robot stay 20 cm from an object
★★★ Target Acquired
- Use the button to start rotating the servo back and forth
- When an object is detected, stop the servo
- Store somewhere the "location" of the object
- Have the servo face forwards
- Rotate the robot towards the object until the object is detected again
- Blink LED when target acquired:)
Using IMU Data
Lots of options:
- Our IMU gives us lots of information about how the robot is moving
- Once our robots know calculus, we can integrate the angular velocity to calculate how much we have rotated
- We can also integrate the acceleration to find linear velocity
★ Measure Angular Velocity
- Using imu.getAngVelZ() data, figure out how fast you can spin the robot!
★★★ Intro to Control Theory
- Rotate the robot at a desired angular velocity
- Lots of hints for this one:
- Use button to start motors at some base_power, something slow, just above the deadband
- Set a desired angular velocity as a float
- In a loop:
- Calculate an error between desired angular velocity and the actual value from imu.getAngVelZ()
- Add a power_boost to the
motor's power based on the calculated error. Be careful
though, MotorPower()takes an integer input and the error
is a float
- Something like this:
- power_boost = static_cast<int>(kp*error)
- where kp is a float (this is called a proportional gain in controls)
- Add the power_boost to base_power
- To know if error has been eliminated, can turn off the led if the error is below some tolerance